Monday, April 22, 2013

oh, for the love of a good 45 degree angle...

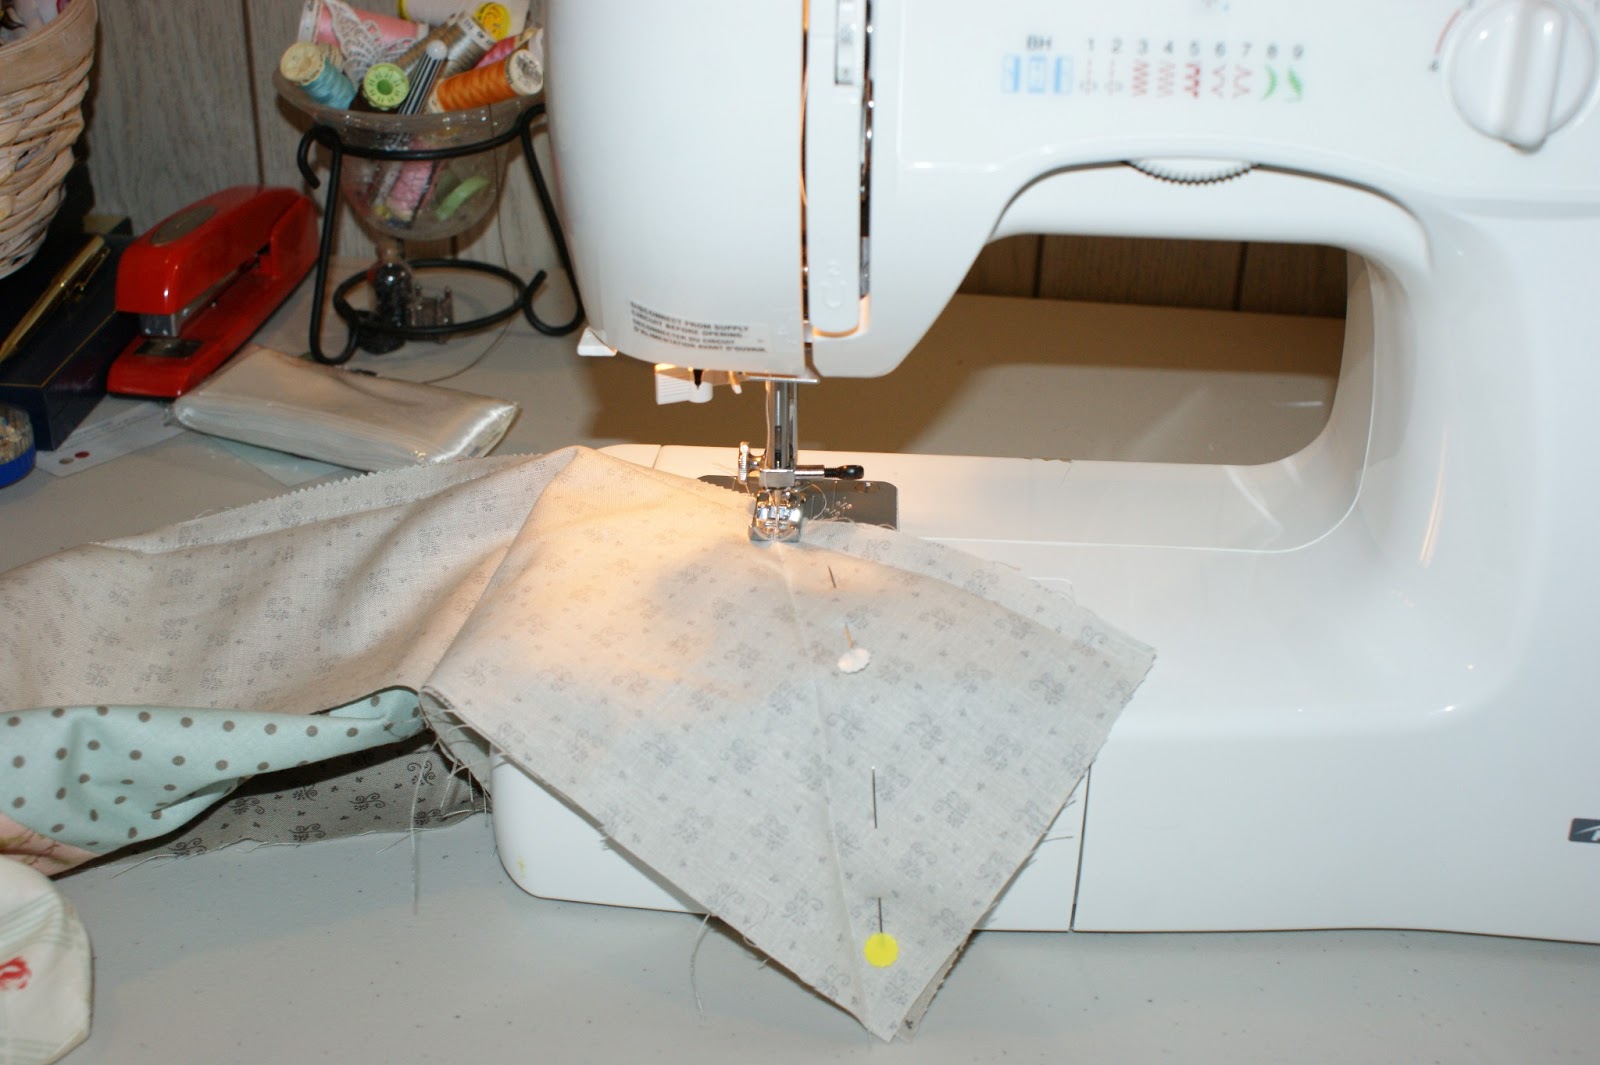
I love the look of clean crisp mitered corners.  It just evens out a quilt, as opposed to having overlapping or log-cabin style corners which sometimes seem lopsided.  And while they're indubitably obvious to some, here's a little method I cooked up to get some nice sharp miters which is not hard at all.

Here we go!

Miters (of extreme awesome):

1.  Start with cutting the strips of fabric you'll be joining for your miter, so that there's lots of overlap.  There's no need to be wasteful, but having enough extra to reach the corners and then an inch or so to spare just makes things a little more stress-free.

2.  Attach your fabric to the quilt (or whatever you're making, I was making a quilt, so I'm just going to keep saying quilt, but miters could have lot of uses), right up to the corner.


3.  Line up the miter, make it look right.  It's not so important that it's a perfect 45 degree angle, as it is that it looks right.


4.  Crease or finger press it.  Because the lines may vary slightly once you actually sew it up, don't bother with ironing it now, you'll have to do that later.  (*Note: if you're using a fabric that's too thick or stiff to finger press, then you'll have to iron it, just know that your lines may move slightly and you'll have to iron out that crease when you give it a final press).


5.  Match up the right sides and pin so that the creases line up.


6.  Lay it so the crease lines up and lies flat.


7.  Time to sew!  Sew it along the crease you made.


8.  Now's the time for the proper press.  Iron it so the seams lay open if you're quilting it with a pattern (ie not along the seams)  otherwise, press the seams off to one side.


9.  Trim it all so it's not so bulky and...


10.  Love it!

    Et voila!  You have miters!  I hope that this can be useful.  I was pretty enthusiastic about it when I made mine up (which is something, miters aren't normally overly exciting things).  Also as a final note, because most projects have four or more miters, feel free to bring all four up to the finger pressing stage, and then take a step back to check that they're even.  That being said, I did mine one at a time and they turned out fine.

    Monday, April 15, 2013

    quilt-ly cuddles

    Long, long ago, I made a quilt top.  See, I had just loved the fabric and it was in a cute little layer cake for not a bad price at all and so I snatched it up and decided I'd make myself a lap quilt.  But, sewing for myself, especially when there's no specific deadline, makes for a project that quickly gets put of the very farthest back of burners.  Besides, I didn't even have anything to back it with yet.  Then, when perusing the local fabric store, I saw a baby quilt made from the same fabric line, and a little spark ignited.  My little Bean prefers to sleep with a quilt, so I thought I could make this for her.  At this point I have finally gotten around to buying some backing and a little extra to border it with, but, because it was just going to be an extra, even bringing it all on Christmas vacation with me didn't give me enough of a push to complete the project.


    Recently, I started knitting a baby blanket for a friend.  The pattern was simple enough, but the yarn was delicate and the needles were small, and after about a week of diligent evening knitting I noticed I had messed up the last five or so rows, so I gave up with that.  Feeling pretty close to failure I remembered my lovely quilt, all ready to get put together and quilted.

    I've tried machine quilting before.  It was a mess; I managed to have a nasty little gather at every join.  It was wretched.  I tried it anyways.  This time: success!

    Voila, a lovely, classy quilt.


    I bound it with satin blankie binding, which I find makes it more baby-ish and less adult; plus babies love the satiny texture.


    Also, I really loved how my mitered corners turned out.


    Bug decided that Dr Seus's ABCs was required in the quilt photos.


    And Bee, our cat of extreme fluffiness, also wanted in on the photography.  What a cozy little scene.

    I hope they have lots of fun playing on and snuggling in it.  I'm so glad it has a home.  I had even started to toy with other uses for a quilt topper, as I began to think it would never reach quilt-dom.

    10 other Uses For a Quilt Top:

    1) Table runner (just make sure you sew on a back).
    2) Line a basket (or cover a box).
    3) Cover a cork board, add a frame, and you have a pretty snazzy pin-board.
    4) Cut it into chunks, which you could frame and make a pretty interesting picture arrangement (or frame in embroidery hoops).
    5) Make a teddy bear.
    6) Tote bag.
    7) Christmas stocking.
    8) Hot water bottle cover (or rice bag cover).
    9) Oven gloves, or re-cover old oven gloves (depending on the material).
    10) Basically, it can be used as a regular piece of material that's just a bit fancier.

    However, like I said, this all started because I loved the fabric so much, so I'm glad I didn't have to resort to chopping it up for anything else.  It was meant to be a quilt and I'm really happy to have had it to give to my friend when I did.

    Thursday, April 11, 2013

    something sweet for mama

    I'm not much of a cook.  I'm not bad at baking (recipes are my friends).  Every now and then I divulge into something really interesting (recipe in hand, of course).  A few years back we rocked some home made marshmallows, and about a year ago I tried this recipe for salted caramels.  It's from thekitchn, which is a brilliant appendage of apartment therapy and has such wonderful recipes.  Mmm, so good.  So when I was having a baking-date with a friend (like a play-date, but it makes us fat) I knew I had a few cans of thick cream in the cupboard and I decided to show off. Once again, the recipe turned out, and so this time, I tried the little suggestion at the bottom of the page...enrobe in chocolate.


    Mmmmm.


    Basically, to any who have any enjoyment in cooking and are willing to follow a recipe, try this.  It's simple enough (although, not kid-friendly; too much stove-top work) and oh, so, good.  For the chocolate I just melted some in a bowl over a boiling pot of water and used toothpick to get 'em good and covered.  And naturally I used a little of my fancy-schmancy salt for garnish.  Naturally.


    Oh, and a little shout out to parchment paper baking cups.  Man, they make life easier (you can see the crinkly edges on my chocolates from where they went straight from the chocolate to the cups).  My only other suggestion is that when boiling the caramel down to the right firmness, err on the side of soft.

    Mmm, so yummy!

    Thursday, April 4, 2013

    a little soft to add to that snuggly

    When Bugaboo was a baby, my mother and I put together a quilt for him and a little pillow to go with it.  


    Well, I knew it would be harder to do one up for little Bean, but with a little vacation time, the quilt (seen here) now has its partner in crime!


    All set for snuggles and fun


    and I'd like to say how awesome it all worked out that the material I bought when she was about 2 months old (spoonflower) was so well selected; she's kind of obsessed with elephants right now!


    Fun fun and more fun!  Take care!


    bye!

    Monday, March 25, 2013

    octonauts, to the launch bay!

    We have a new love in this household.  While vacationing at my parents over Christmas, Bugaboo discovered the marvelous Octonauts.  Anyone who regularly watches Treehouse knows what I'm talking about.  To everyone else, it's an adorable tv show aimed at toddlers based on the book series of the same name about eight animals who live in an underwater base and have adventures with the animals around them. "Explore, Rescue, Protect!" is their motto (I love it), plus the kiddies get learn a lot of stuff about sea-creatures.  Anyhow, my point, is that while we usually have way too many toys in the house, just after Christmas we are well beyond capacity.  So when we're playing with lego and my little man starts asking me to build him some octonauts, I decided to make him some octonaut lego.

     It was incredibly simple, I just found eight different coloured lego blocks,
     Printed out a picture of each of the crew,
     And taped them on to the blocks.
     (I have since re-sized and reprinted them so there was nothing hanging over the edges)
     But they shape up to a pretty cute crew!
     And for about 15 minutes of effort, my little guy has a new toy that didn't cost anything, and doesn't take up anymore space than it already had.

    Tadaa!

    Sunday, March 17, 2013

    nautical charts

    Ouch!  2012 has not been my year for blogging.  And embarrassingly, 2013 seems to be following suit.  However, I'm not ready to let go yet, and so I stride forth, once again into the blogosphere and give you an update on my crazy cozy life.

    I do have a project or two to ready to share, but instead, I have a little giftie.  Remember a long long time ago when I was saying how I was going to do up a nice proper version of the graphs I used to make my octopus hat and pirate ship scarf?  Well, voila, tout finis!

    Here's the Octopus Chart (click for full view):


    for a finished product that looks something like this:


    or this:


    And here's the Pirate Ship Chart:

    for a little something that will turn out like this:


    Yay! (You may notice that my charts are different formats.  Well, I actually had a much more detailed and therefor larger chart drawn up for the pirate ship, but it would have made the scarf too big for my little guy.  I had wanted to giver you that chart as well, but my computer is full of gremlins and the process by which my octopus chart was made would not be duplicated.  I made the small ship chart with a lot of cut and paste blocks; very tedious.)

    With any luck, these will be understandable and useful.  Basically, it's just simple intarsia, using two colours for the octopus (the x being one colour and the o another) and three for the ship (the blue squares are supposed to be white, and the blank squares are blue).  Perhaps I will make a tutorial for intarsia one day, but for now, your best bets lay with a 'how to' book or the youtubes!

    Happy knitting and if anyone finishes a project with either of these, I would be simply over the moon to see a picture of it!  Nautical charts indeed, oh the cleverness of me!

    Ta!

    Friday, November 23, 2012

    radio silence, and a jar

    Man, where have I been.  Parenting I guess.  It's been a busy busy time with two little ones about.  To be honest, a one year old and a three year old are a handful. However, we're still finding time to have fun (although, not so much time for crafts and mommy fun stuff).  I would like to post from the kids birthdays, and a few little knitting projects I have on the go, but today, what I am working on, is parenting.

    We're at a point (with our three year old) where it seems that everything we say to him is either a threat or a bribe.  We can't just ask him to do anything, because he just won't listen if he doesn't have an incentive.  Whether it's something important, or something as simple as getting dressed.  Everyday, a battle.  The flip side to this is I just don't know which way to go with him.  I'm not opposed to changing my strategy.  I just don't know where to go.  He has grown into an extremely strong willed individual, so I never know whether I need to be more patient, or more strict.

    In short, I've decided to try something different.  Not usually my style, but like I said, I'm willing to change.  Simply, we picked up a few packages of bingo chips and a jar.  Blue for good, and yellow for bad.  Every time he does something good, a blue one goes into the jar, and every time he misbehaves or doesn't listen, a yellow.  The idea is that we don't threaten with them, or bribe with them, they just happen.

    "Time to get dressed bud," "No!" - Yellow.
    "Please can I have some crackers?" "Sure thing, nice manners bud" - Blue

    The point, is that when he then is asking for treats or to watch TV or something else special, we can look at the jar, and he knows that if there are more yellows than blues, the answer is going to be 'no'.

    That's the general outline.  My other hope is that it will help us be more consistent, not having to always threaten things we don't really want to have to follow through with ("be good or we're going home" is the worst).  We've started this tonight (oh, and the jar gets emptied out in he evening, fresh start to every day) and hopefully it will last the week.

    And on that note, I have a little hooligan to put to bed.  Night night.